Data Uploader
The Data Uploader feature enables the users to upload critical data sets in bulk in the RO database.
Uploading Data
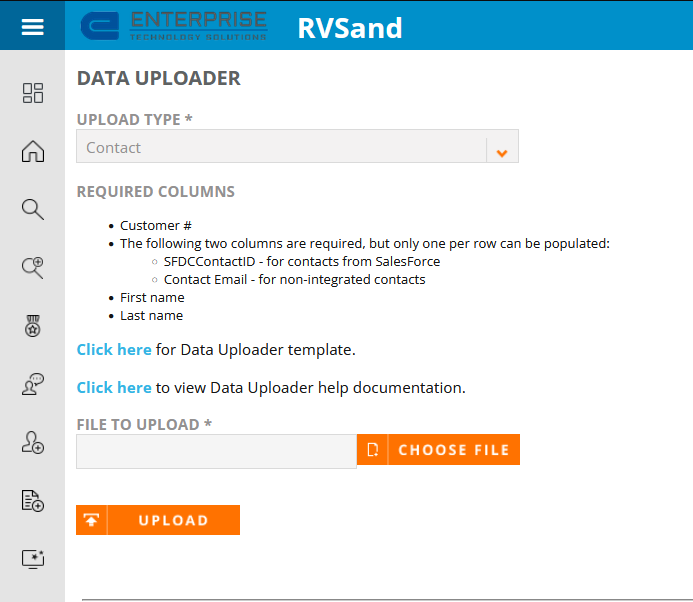
- Click the Administration icon and select Data Uploader. The following page will be displayed:
- Select an Upload Type from the drop-down menu.
Customer - Add/edit customer details at account level
Contact - Add/edit customer details at contact level
Content - Add/edit collateral (asset) details
Implementation - Add/edit implementation or product group details
Reference Participation - Add/edit non-SFDC fields which control the reference participation potential for contacts
Reference Participation History - Add participation history for desired customer contacts
Note: Reference Participation for the contact with appropriate asset type & implementation must exist before uploading the participation history. You cannot edit the existing Reference Participation History. Contact ID can be availed using Report Builder's contact report area.
System User - Add/edit non-SFDC fields about the users that have access to RO
Quotes - Creates new quotes for desired customers
Fast Fact - Creates new fast facts for desired customers
Tip:
Each row in the excel sheet will create a new Fast Fact/Quotes. Existing Fast Fact/Quotes cannot be deleted using data uploader.
When uploading a name in any upload type, you must use the email ID instead of the actual name. For example, in fields such as Quote Author or Fast Fact Author.
Note: When you select an upload type, the required columns list appears below. The required column terminology is based on the caption created by the users.
- (Optional) Users can get the Data Uploader template by clicking on the link.
- Create an excel sheet with all the required fields as columns or export the data from the RO Platform using Report Builder. Make sure that the columns are in the correct format.
- Click Choose File and select the excel sheet with preformatted data.
- Click Upload.
Note: This link will take you to the Report Builder, where you can generate an excel sheet and download it. This excel file can be used to add the new/revised data to the Data Uploader.
Tips & Best Practices
Data Integrity
- Always make a backup of the existing data in RO before performing an upload in case it will become necessary to revert to a prior state of your data.
- Use a consistent naming convention for exports from RO and uploads into RO. This will be a great help if you need to revert to a prior state of your data. For instance, the following name conventions provides useful information:
- Download folder
- YYYY-MM-DD – Customer (all records, all fields)
- YYYY-MM-DD – Contact (all records, all fields)
- YYYY-MM-DD – Reference Participation (all records, all fields)
- YYYY-MM-DD – System User (all records, all fields)
- Upload folder
- YYYY-MM-DD – Customer, [note specifics] (number of records)
- YYYY-MM-DD – Contact, [note specifics] (number of records)
- YYYY-MM-DD – Reference Participation, [note specifics] (number of records)
- YYYY-MM-DD – System User, [note specifics] (number of records)
- Download folder
Example: “2022-01-15 – Customer, updating Account Referenceable, (12)”
Exporting Data for Reference
- Define then export reports from RO to serve as the template for what will be changed. Delete columns and rows from this template, then make desired changes to the data.
- Where possible, define reports with the ‘comma delimited’ option unchecked, i.e., data will be parsed into its own rows in the spreadsheet to make it abundantly clear what to change. This is especially helpful for Available Reference Assets report (used for Reference Participation import). It will not be possible to parse out the values for multi-select menus in this way.
Importing Data
- The data uploader requires an MS Excel file format (.xlsx).
- Develop a complete understanding of how uploads work in shimbonda before performing any uploads in production.
- Test the import by first uploading a single row.
- Upload only the number of rows and columns required to accommodate the desired change. This will help to ensure you don’t inadvertently change other data. Focus on one field at a time to avoid complicated upload templates.
- The data uploader will import the first (left most) sheet in a workbook only, however it is recommended that to avoid confusion to only have a single sheet in the workbook for uploads.
- The data uploader can only be used to update non-SFDC and non system-controlled fields (for example the RO system-controlled fields ‘create date’ and ‘created by’ cannot be updated via the data uploader).
- Check at least a sampling of results immediately following the import.
- Observe the instant feedback from the data uploader screen to make sure the fields you had intended to upload are not included among the list of fields that the data uploader could not import.
- Always check at least a sampling of your data upload to make sure the import worked as intended. Inspect changed data in the UI, or use reports.
- Admin > Upland Analytics reports should be used to view changed data in real-time.
- Admin > Reports is not a good source for checking uploads immediately after import because these reports are generated from data that could be up to 24 hours out of date (refreshes nightly at approximately 10 pm Eastern/New York time).
- The typical reason why a field did not import will be due to the field name in the upload spreadsheet not matching the corresponding field name in RO.
- A good rule of thumb for knowing what the import field name should be is to view the label within the UI.
- Every non-SFDC field and non system-controlled field will be overwritten with the corresponding field from the upload. (SFDC fields and system-controlled RO fields cannot be updated by the data uploader)
- If you don’t want to overwrite existing data, don’t include the record / row or field column in your import. Focus on updating one field at a time to keep the template simple and avoid unintentional data updates.
- Uploading a null or blank value in the spreadsheet will have the effect of deleting that value from the record.
- For your visual reference, it is perfectly fine to include fields in the upload file that do not exist in RO or cannot be imported. For example, you may want to include the name of the customer for your visual reference even though it is a SFDC field and will not be imported. In this example “customer” will be displayed as a field that was not imported on the data uploader feedback screen.
Adding vs. Editing Records
- Adding new records is very similar to editing existing records, with the exception that when adding a new record, additional fields may need to be included in the import file to account for the required fields of that particular record type. For instance, when adding a new Contact, the following fields are required:
| Field Name | Required For |
|---|---|
| SFDCAccountID | Add / Edit |
| SFDCContactID | Add / Edit |
| Contact Type | Add |
| Reference Status | Add |
- In addition to the required system fields for the record, it is also possible that additional custom fields may have been flagged as required during implementation or subsequent configuration. Each of these required fields will also need to be included in the import file.
- Required fields are denoted in the UI with the red asterisk.
Menu-Driven Fields
- For menu driven fields, data from the upload file can also be leveraged to add that value to the drop-down menu if the value did not already exist in the menu.
- The data loader cannot be used to change the name of an existing value in a menu.
- Importing different upper / lower case letters than already exists in the menu will have no effect, i.e., the upper / lower case format of the existing menu item will remain unchanged.
Multi-Select Fields
- When uploading more than one value in a multi-select field, the format in the upload file must include the vertical pipe character as the separator with no extra spaces, i.e. “value 1|value 2|value 3|value 4|value 5|”.
- When exporting multi-select fields from RO, each item will initially be separated by a comma and space, therefore “, “ will need to be replaced with “|” in the import file. Failure to convert from the comma separator (with space) to the pipe separator (with no space) will result in a single menu item being created for each such record imported in the format of your upload.
Deleting Records
- The data uploader can only add new or edit existing records of data.
- The data uploader cannot delete records of data.
- If it is desired to delete a record of data, consider just changing the status or search values, which can be done with the data uploader. Otherwise, you will need to use the RO user interface to delete a record.